Selasa, 26 Februari 2008

Star - Burst Rug

LIZZIE REAKES

This exuberantly modern hooked rug is worked in a traditional way but with a variety of different materials, many of them acrylics. After hooking, the rug is completely sheared and the back sealed. Shearing is quite tiring for the hands but the effort involved is worthwhile when a rug like this is produce.

So many rag rugs are rectangular that it is good to have a design for a different shape. This rug looks most effective on a light pine floor in a modern room.

107 cm (42 in) in diameter

Material and Equipment

  • Drawing paper
  • Coloured pencils
  • Thick felt-tip pen
  • Ruler
  • Ball of string
  • Scissors
  • 127 x 127 cm (50 x 50 in) hessian/burlap
  • Drawing pin
  • Thin card
  • Frame with dowelling
  • Dressmaker’s pins
  • Sewing machine
  • Hook
  • Assortment of material
  • 127 x 127 cm (50 x 50 in) hessian for backing
  • Latex/PVA glue

For this rug, sketch the design on drawing paper to size and colour it to act as a guide for hooking the materials. To create a rough circle shape, mark the centre of the design with a felt-tip pen, then measure the distance from the centre to the edge with string, allowing a little extra to make a loop to tie round the pen.


Cut the string and make a loose knot at the opposite end to the pen. Lay the hessian on a protected surface. Place a drawing pin in the knot of the string and press into the centre of the hessian. Tie the other end to the felt-tip pen and then draw a circle carefully as if using a compass


Using the same technique, draw another circle about 15 cm ( 6 in) inside the previous one to mark the border. Trace and cut out the main shapes of the start-burst design in thin card, place them on the hessian and trace around them with a felt-tip pen.


This rug is worked on a frame which uses dowelling to secure two of its edges. To make a channel to run the dowelling through, turn down the hessian on two sides (top and bottom if the design is rectangular), pin and machine across. Assemble the frame.


Using scissors, cut up some of your materials into strips about 1 cm (0.5 in) wide, ensuring they are always on the straight, never on the bias. Commence hooking from the centre outwards.


Continue your hooking until a reasonable amount has been worked.


Shear the loops by cutting across them as if you were cutting a lawn. It is good idea to alternate shearing and hooking as you go.


This shows the final loop being put in place.


Complete the shearing around the edge and brush away the trimmings.


Remove the rug from the frame and lay face-down on a table. Place the piece of backing material on top of the rug. Feeling the shape with your felt-tip pen, draw around the rug. Cut out the shape in the backing material, the same size as the finished rug.


Remove the backing material and spread latex all over the reverse side of the rug. Make sure the surface is well covered but avoid using an excessive amount.


Lay the backing on to the latexed back and press it with a hot iron


Cut the surplus hessian away from the worked rug, leaving about 154 cm (6 in) all around for turning. Snip the hessian at intervals all around the rug.


Apply latex to the cut edges and press them down firmly, slightly overlapping, as shown. Allow to dry.


Suppliers


SUPPLIERS IN THE UNITED KINGDOM

Weaving loom, the traditional handmade hooks and proggies, hessian, grey polyester, transfer pencil, tuition, courses and lectures

Ann Davies, 1 Wingrad House, Jubilee Street, London E1 3BJ


Books on rug-making and associated crafts

Crafts of Quality Books, Unit 8, Bow Triangle

Business Centre, Eleanor Street, London E3 4NP


Shuttle hooks and courses

Jenni Stuart Anderson, The Birches, Middleton-on-the-Hill,

Herefordshire HR6 0H2


Shuttle hooks and large frame for shuttle hook work

Debbie Siniska, 12 Preston Court, The Crescent,

Main Road, Sidcup, Kent DA15 6 NT


Inexpensive rug canvas

Anita Fell, ‘Secrets’, off Whitehill Road,

Crowborough, East Sussex TN6 1JA


Locker-needle hooks and tapestry canvas

Christine Ellis, Dolgellau Design, Refail, Tir Stent

Bach, Dolgellau, Gwynedd LL40 2 RF


Locker0needle hooks

Maureen Preen, The Woodlands, Bron-y-Buckley,

Welshpool, Powys SY21 7NQ


Out-of-print rug books

Keith Smith Books, 78b The Homend, Ledbury,

Herefordshire


Pure new woollen material by the metre

Joshua Briggs & Sons Ltd., New Mills, Idle, Bradford


Artist’s stretchers and PVA

Russell & Chapple, 23 Monmouth Street, London

WC2H 9DD


Specialist frames as depicted in several of the projects

Christine Birch, Pen-yr-Allt Farm, Llanrhychwyn,

Trefrew, Gwynedd LL27 0YX


Russel Dye System and other dyes

Carters, Station Road, Wickham Bishops, Essex

CM8 3 JB


For those interested in rag rug-making of all kinds,

The Association of Rag Rug Makers produces a quarterly

Newsletter and will answer any queries or give advice

on most aspects of rag rug-making other than weaving.

The association of Rag Rug Makers, 1 Wingrad House,

Jubilee Street, London E1 3 BJ


SUPPLIERS IN THE UNITED STATES


Wool, plaiting aids, rug backings and foundations

Braid Aid, 466 Washington Street, Pembroke, MA 92359


Supplies for all traditional hand hooking

Joan Moshimer’s Rug Hooker Studio, Box 351,

Kennebunkport, ME 04046


Unusual tools, backings and adhesive

Gloria E. Crouse, 4325 John Light Road N.E.,

Olympia, WA 98506


Linen backing material, dyes, cutters, frames, wool and hooks

Forestheart Studio, 21 South Carroll Street, Frederick, MD 21701

100% wool yardage and supplies

Ruth Ann’s Wool, R.D. 4, Box 340, Muncha, PA 17756


SUPPLIERS IN CANADA


Designs and supplies

Rittermere-Hurst-Field, 45 Tyler Street, Box 487

Aurora, Ontario, L4G 3L6

Senin, 25 Februari 2008

Basic Techniques

The two main rag rug making techniques-hooking and prodding- are described in this section, together with details of how to stretch your base material on different types of frame. Advice is also given on choosing colours, materials and designs. Step-by-step instructions on the less common rug-making techniques are given in the projects.

CHOOSING COLOURS

Colour and texture are o great importance in this craft. The texture of a particular material can often spark off idea for design, and the effect of a fabric can be transformed when hooked or prodded: a piece of tweed, for instance, when hooked, can look like the scales of a trout. The width of the strips of material can sometimes change the character of your work, too. It is very much a matter of developing an eye for colour and texture. It is advisable to keep a scrapbook of any magazine illustrations, postcards, or photographs that appeal to you, to remind you of ideas for using colour or of designs that could be adapted to a rug, wallhanging or other article. Any sample pieces of hooking should also be kept for reference.

To Use colour effectively in your work means you should allow either warm or cool colours to predominate. Warm colours are those which are generally considered to be bold – reds, oranges and yellows. Cool colours are the various shades of blue, purple and green which are submissive and retreat into the background. Nowadays colours rules are often broken; this can result either in very vibrant pieces of work or, if you are not careful, the overall effect can appear discordant and harsh.

Once you have decided on a colour scheme, plan how to distribute the colours. Use colours with caution, looking at how they react to each other. Your colour scheme may not only be dictated by your available materials, but also by where the rug will be placed. (If it is to be put in a much-used area, you may not want to use light-coloured materials). A good method of trying out colours is to spread small pieces of the material you are considering using on the floor of the room in which the rug will be placed. Arrange the colours in a way in which you th9ink they look best together, then stand back and consider the composition. You will easily see any colours that are either too bright or too dull. Add or subtract colours until you obtain a pleasing combination.


MAKING STRIPS

As a general rule, the material should be cut on the straight, not on the bias. The exceptions are mentioned in the relevant projects. Always ensure that you have enough of your chosen material. It is difficult to estimate the quantity you will need as this depends on so many factors such as the height of the loops and the type of material, but a useful rule of thumb is to fold your chosen material in four and place it on your background base material – this will give an approximation of the area it will cover.

Whatever material you are using, experiment before you cut all the fabric. With some synthetic jerseys you will have to cut wider strips to compensate for their stretching qualities. A useful general width is 5 mm (1/4 in), but if you are using a thicker material, you may have to experiment to find the best width. Fraying materials have to be cut slightly wider; they should be turned under to give and edge for the hook to bring up to the front. Some people like to work with narrow strips, others with wider ones. It is very much a personal choice. Where possible, tear the material to get a straight edge; however, this is not possible with synthetics or jerseys. The length of trips can vary-generally it is best if they are over 15 cm (6 in), but they can be as long as you wish.

Before you tack the backing material down, it is a good idea to store a few strips of the material used in the hooking between the rug and the backing. Then if you have any disasters in the future and your rug gets marked or damaged in anyway, you have some strips of matching material for running repairs.


DYEING

If you do not care for the colour of any material, you can dye or overdye it. Of course if, for instance, you are using yellow dye on a blue material, the result will be not yellow but a shade of green. White or cream material is ideal for dyeing.

You can also try removing the colour from material by putting it in large pan of water to which a few tablespoons of ammonia are added, And allowing the material to simmer (not boil) for a couple minutes. You will be surprised by how mush colour comes out. Rinse the material well and then set the new colour by simmering for about half an hour in a vinegar or salt bath. You only need to add a couple of tablespoonsfuls of either to the water, which should cover the fabric. (Salt turns the colour slightly grey, while vinegar brightens it). Rinse well. This method works better with natural or mixed fibres than with synthetics. If the colour is very difficult to move, use a commercial dye remover.


DESIGN CONSIDERATION

The fun of using discarded clothing or off-cuts o material is experimenting with dyes. Here some pieces of bright orange material have been simmered in a proprietary brand of dye remover, and taken out of the pan at various intervals to produce a range of shades which all blend with each other.

A simple design can look just as impressive as a more complicated one. Obviously, when planning a rug or wallhanging, you have to bear in mind where you intend to place the finished article. Is the rug going to be seen from all angles or only from one position? Do you want it to be rectangular, oval, circular or another shape? (You will generally find that a square is not a pleasing shape for a rug). You should also decide whether, in the case of rugs, you want a border and if so, of what width. A border should not dominate the rest of the rug but equally it should not be so narrow that it looks lost.

There are many aids to designing, including patch-work templates, French curves, cut paper shapes, ordinary household articles such as cups and saucers, compasses and even fallen leaves. Since the advent of photocopiers with enlargement features, a small design – even a doodle – can be enlarged to act as a basis for design. Avoid anything too fussy, and keep your background simple if the other elements are ‘busy’. Do your preliminary sketch in pencil and then, when you are satisfied, use a waterproof felt-tip pen to go over the design. With prodded rugs, remember that, because they have a shaggy pile, the design needs to be much simpler and will have less delineation. Often a pleasing result can be achieved just by using colour skilfully, although simple shapes, animals and flowers can be very effective, to.


PUTTING BASE MATERIAL ON A FRAME

In any project in which a frame is used, the base material must be stretched very tautly, to facilitate the entry of the hook or other implement. If using artist’s stretchers for the frame, the base material should be the same size as the outside edge of the frame to ensure that the weft and warp of your material are straight. Using the edge of the frame as a guide, staple or pin the hessian/burlap on to it, working first down one width and one length. Then, pulling the hessian very taut, pin or staple the other two side.

Place your frame in good light in front of you. Make sure you are sitting comfortably, not hunched over the frame. You may find that leaning the frame against the edge of a table or over the two arms of an armchair is helpful.

It is essential to ensure the edges of the hessian/burlap are straight when placed on a frame, otherwise the base material will become distorted as you work.

To ensure a straight edge, ease a thread from one side of the hessian gently and put; it out. When you have pulled the thread out, you will see this leaves a line which can be used as an accurate cutting guide.


TRANSFERRING THE DESIGN

If you are not confident about outlining a design freehand, there are several ways to transfer a design on the base fabric. Templates of shapes can be simply cut out in stiff card, placed on the backing and drawn around with a waterproof felt-tip pen. Or, a transfer pencil (which will transfer the design on to the fabric when a hot iron is used to draw around the design on tracing paper or greaseproof paper. Pin the paper carefully to the backing with the transfer-side down, and go over the design with a hot iron. Check it is being transferred by lifting up a corner to see if the transfer appears on the hessian/burlap. If, when completed, the lines are a little faint, draw around them with a waterproof felt-tip pen.


HOOKING TECHNIQUE

Hold a strip of material in one hand loosely between your forefinger and thumb, under the hessian/burlap where your hook will enter. Holding the hook in the other hand as you would a pencil, and working from the front side, push the hook firmly through the hessian. Do not be too gentle: it is essential that you make a nice big hole. If you do not, the barb could catch on the threads when you pull the hook back up. Find the strip of the material with the hook and bring one end of the material about 2.5 cm (1 in) through the hole up to the front.

Still holding the same strip of material loosely under the hessian, and working from right to left, leave two threads of the base mesh and then push your hook firmly into the hessian again. Catch the strip with the hook and pull it up tautly through the new hole to form a loop. Remove the hook from the loop. Repeat step 1 and 2.


The reverse of the work shows how the hook completely catches the material to bring it up to the front. Don’t attempt to feed the material on to the hook; instead, allow the hook to find the strip of material. The reverse of your work should look like rows of running stitches. If you have any loops appearing on the reverse, this means you are not pulling your material up firmly enough to the front of the work. If you find you are pulling out your previous loops, this means you are holding the strip of material tightly instead of allowing it to run loosely between your thumb and forefinger.

Continue working from right to left until you reach the end of the material strip. Bring the end o the material up to the front. To begin a new strip, push the hook into the same hole as the end of the previous strip and bring the new strip end up alongside it. Continue hooking as before. ‘In, scoop, loop’ will help you to remember the whole movement.


Cut any single ends that are showing so that they are level with the loops


Leave about two threads between each row of hooking. If using wider strips of material, you should leave a few more threads between the loops and rows. Remember the loops must be close enough together so that you do not see the base material, but not so closely packed that they make the material ‘hump’.
Never be tempted to carry strips of material across the back of the base material from one point to another; You could push your hook into them and accidentally pull out a lot of loops.


PRODDING TECHNIQUE


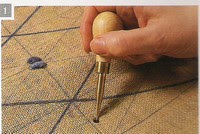
Working from the reverse side, and holding the prodder as you would a pen, push
it firmly into the hessian/burlap, making a nice large hole.


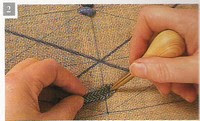
Using the prodder, push one end of a cut strip of material firmly in to the hole you made, from the reverse to the front.


Using the fingers underneath the hessian, pull the strip halfway through – in other words to the right side of the work.


Leaving about two threads of the hessian mesh, and still working on the reverse of the work, push the prodder in again to make another large hole. Push the other end of the strip through to the right side and again pull it from underneath, so that it is level with the first end.


Push the prodder into the second hole with a new strip of material and repeat Step 2, 3 and 4. (Two strips will therefore come through each hole).


When repeated these steps make the shaggy pile which appears on the right side of the rug.


How materials look when hooked

Around the outer edges of the photograph are the original materials and, adjacent to them, the same materials when hooked. It is always fascinating to see the effects achieved by hooking different materials. When in doubt about the suitability of any material, just work up a small piece to see the effect; keep these samples in a notebook for future reference.

CAVE HOUSE

Back to the prehistoric era, perhaps this is the perfect name for a house in Wolverley. Not an ordinary house, if it could sell by the price of 100.000 Pounds (approximately more than 1.8 Billion Rupiah). Yap, this house is a cave house. As literally cave house complete with doors and windows, just like a real house should be. A lot of people wanted to buy the house although it doesn’t have any water nor electricity facility. Talk about back to prehistoric era.Kembali ke zaman purba, mungkin inilah sebutan yang tepat untuk sebuah rumah di Wolverley. Bukan sembarang rumah bila terjual dengan harga 100.000 Poundsterling (kira-kira lebih dari 1,8 miliar rupiah). Yap rumah ini adalah rumah gua. Benar-benar gua yang berpintu dan berjendela layaknya sebuah rumah. Banyak sekali orang yang ingin membeli rumah ini meskipun tidak ada fasilitas air atau listrik. Benar-benar kembali ke zaman purba ya?

Minggu, 24 Februari 2008

Al Qur'an Kecil (Mini Al Qur'an)

Di jual: Al Qur'an kecil, kondisi sangat baik, warisan keluarga, cocok untuk kolektor dan penggemar Al Qur'an. Ukuran 2 x 3 cm
Harga Rp 30 juta
Hubungi
087880024045 atau 081931419580, lionqz@yahoo.com


For sale : Mini Al Qur'an, very good condition, family inheritance, suitable for collectors.
Price US$ 3000
Contact 087880024045 or 081931419580, lionqz@yahoo.com


Keris Tua (Old Keris)

Di jual: Keris tua, kondisi sangat baik, antik, diperkirakan berumur lebih dari 100 tahun, warisan keluarga, gagang dan sarung masih original, cocok untuk kolektor dan penggemar keris antik. Panjang keris 44 cm
Harga Rp 200 juta
Hubungi
087880024045 atau 081931419580, lionqz@yahoo.com


For sale : Old keris, very good condition, antique, 100 years or more, family inheritance, original handle and casing, suitable for antique collectors.
Price US$ 20,000.
Contact 087880024045 or 081931419580, lionqz@yahoo.com


THE POLE SWIMMER

Lewis Gordon Pugh an Englishman is the first swimmer who swam in the North Pole. Lewis succeeded to reach 1 kilometer distance by 18 minutes and 50 seconds. You know what? The water temperature at that time was 1.8 degrees Celsius.

Amazing! In fact even polar bears can’t swim with extreme temperatures. Lewis did this to determine people to think seriously about the Global Warming that is getting worse at this present moment.

Lewis Gordon Pugh asal Inggris adalah orang pertama yang berenang di kutub utara. Lewis berhasil menenmpuh jarak satu kilometer dalam waktu 18 menit 50 detik. Tahu tidak, suhu air pada sasat itu -18 derajat Celsius. Hebat ya! Padahal beruang kutub saja tidak bisa berenang dengan suhu air sedingin itu. Lewis melakukan hal ini dengan tujuan agar banyak orang mulai serius memikirkan pemanasan global yang semakin parah.


Sumber : Fantasi Kids

NOT JUST ANOTHER REFRIGERATOR

Refrigerator is not a Luxurious item at this present moment. Every single household has it. Refrigerator comes in various ranges. Start from the common one until the ones that also equippped with electronic devices, such as TV or Computer.

The latest one is the refrigerator which can be use to watch TV, DVD and Digital pictures. Its name is Centralpark Connection from Whirlpool. The special feature is the gadget that use for watching TV, DVD, or digital pictures can be reattached, so you can choose which one you want to use.

Kulkas alias lemari es sudah bukan lagi barang mahal di zaman sekarang. Hampir setiap rumah memilikinya. Jenisnyapun beragam, mulai dari yang biasa hingga yang ditempeli beragam aksesoris elektronik, seperti teve atau komputer.

Yang terbaru adalah lemari es yang bisa digunakan untuk nonton teve, DVD, dan foto-foto digital. Namanya Centralpark Connection dari Whirlpool. Keistimewaannya , alat yang digunakan untuk nonton teve, DVD atau gambar digital bisa dilepaskan!. Jadi kamu bisa memilih yang mana yang sedang diinginkan.


Sumber : Fantasi Kids

BARANG ANTIK LEMARI CANTIK !!!

Di jual: Lemari kayu Jati, full ukir, anti rayap, finishing politur coklat tua, kondisi sangat baik, antik, cocok untuk kolektor dan penggemar furnitur antik. Khusus Bandung dan JABODETABEK
Harga Rp 25 juta Sudah termasuk ongkos kirim
Hubungi 081931419580, lionqz@yahoo.com


For sale : Antique cupboard, banyan wood, fully Indonesian traditional carving, anti termites, finishing politure, very good condition, suitable for antique collectors.
Price US$ 2500.
Contact 081931419580, lionqz@yahoo.com


Sabtu, 23 Februari 2008

Materials and Equipment

The basic materials and equipment required for making rag rugs or wallhangings are relatively inexpensive. The frame and hook are probably the most costly items, but they do not wear out, so you will not need to replace them. Obviously, if you do not have a rotary cutter and mat, a pair of scissors will suffice. If you become increasingly fascinated by this craft, you can add to your aids, possibly acquiring some of the more expensive items which are available in the US but not the UK, such as a gadget which cuts several strips of material at the same time, or a frame which sits comfortably on your lap.

MATERIAL

Rag rug making is a thrift craft, which provides and ideal opportunity to use up any materials you have available, such as remnants left over from dressmaking, rummage sale bargains, or old blanket.

You will see by looking at the projects and the items illustrated in the Gallery that a wide selection of materials can be used in rag rug making. Mostly woollens, jersey, felted jumpers and cardigans, worsteds, synthetics and blankets are used for rugs, but for other items such as wallhangings, cushions or jewellery, the fabric world is at your dispposal. Cotton has been used in one or two of the projects but it is not advised for hooked or prodded work as it flattens and picks up the dirt easily. However, when used thickly as in the Garden Wallhanging project, it has a charm of its own.

Woollen material is a wonderful medium in which to work when making rugs, but it is becoming an expensive commodity. Pure wool blankets were once often used but, since the introduction of continental quilts and duvets, they are getting scarcer. Scrap materials such as felted sweaters and other discarded clothes are also used-these should always be washed before using them for making rugs. Synthetic are often used nowadays but they have a much springier feel than wool.

If you are making a rug, you obviously need to use hard-wearing materials of similar thickness to keep the pile fairly level, but if you are making a wallhanging, you can use whatever you wish to achieve the intended effect.

Lurex, netting, organza, sweet/candy wrappers, leather, metallic foil, raffia, crisp/chip packets, polythene and Lycra have all been used by rag rug makers. The possibilities are indeed endless and it is often a matter of experimenting to see what can be used.

If wondering whether a material is suitable, just 'hook it and see'!. If using discarded clothing, first remove all the buttons and other fastenings, and unpick the scams. Always wash any material that has been used. (Before putting old blankets in a washing machine, make sure that the edges are not frayed as loose fibres could clog up the machine).


FRAMES

Three types of frame can be used, all of which are illustrated in the different projects in this book. Frames should always be larger than the dimensions of your rug to allow for hems and turnings. The cheapests and easiest frame is formed from four artist's stretchers, which are available from any good art and craft supplier. They are already mitred and just have to be fitted together. You must remember however, that you have to be able to reach into the centre of the frame when hooking rugs. You can make a rug as long as you like but the width is limited to the length of your arm. Creating a particularly large rug can be a problem unless you have a special large frame. One solution is to work one area, and then remove the hessian/burlap from the frame and reposition the unworked area of hessian over the frame, repeating the process as necessary to complete the rug. Or, you could work your rug in sections and sew them together afterwards. This does mean that there would be a weak spot where the material has been joined together. However, if you leave an unworked border all around a completed section, then lay the border of a second completed section on top of the first and hook through these two layers, this weakness will be avoided. (A word of warning though: hooking through two layers of hessian is not easy). Another type of frame is comprised of four pieces of wood, two with holes punched at varying intervals and two made of heavier wood with channels for the hessian and dowelling. These frames are available in various sizes. They are very useful because of the ease of putting in the hessian and the fact that the material can be rolled over one end so that rugs of varying lengths can made. The third type of frame is similar to the above but has strong braid attached to the two short ends, like an embroidery slate frame. The hessian is sewn on to the braid on two sides, then the two stretcher bars are attached on the remaining sides. It is not advisable to use an embroidery hoop, except when working small pieces such as jewellery.


BASE AND BACKING MATERIAL

The material used most frequently is hessian (know as burlap in the United States, and brin in Newfound-land). Always buy the best quality you can obtain; do not be tempted to use cheap upholstery hessian. For hooking and prodding, any even-weave material can be used providing the mesh is not too tight. If you want to fill in a design but not its background, in a particular project, furnishing fabrics are worth considering as a base. Grey polyester is sometimes used for hooking . It is slightly more expensive than hessian but some people are opposed to the latter on the grounds that it is possibly not as long-lasting as other materials-nonetheless, a hessian base will last many years. Rug and tapes try canvas are used, but again do not be washed before use. Backing fabrics can be used, though they are not crucial - carpet binding around the edges is usually sufficient. However, backing fabrics can be latexed on to the back of a completed piece to tidy and secure it if desired. Choose a material appropriate to the use-often hessian is used, or a polyester. A dual argument applies to the use of backing fabric: some say that by backing your rugs, grit can build up and act as an abrasive; others feel that it makes the rug longer-wearing.

HOOKS

The implement used for hooked rugs is similar to a crochet hook but has a much sharper point, like a barb. The ones illustrated in this site are handmade from yew and brass and fit nicely into your hand. Occasionally old hooks can be found in junk shops.


PRODDERS

The prodders illustrated are similar to the hook bur without the barb. A sharply pointed piece of wood was often use as a prodder; this can be whittled from thick dowelling.


LATCH HOOK

The latch hook is the hook many people associate with rug making, but not necessarily with rag rugs. As the latch hook has a deeper hook than the traditional one used for hooked rugs, it enables much wider pieces of cotton to be pulled easily through the rug canvas (it is not appropriate for use with hessian/burlap). A much bulkier effect is therefore achieved with this technique.

SHUTTLE HOOK

A shuttle hook is simple articulated wood and metal tool which is used to make a series of loops through a hessian/burlap background. It is considered quicker than using the traditional hook. Little is known about the origin of this implement, but it was popular in the early part of this century, and in recent years there has been a revival of interest in this type of rug hooking. More difficult to obtain, shuttle hooks can be found in specialist suppliers.
A shuttle hook in action: the design is worked from the reverse side of the base material. The shuttle is threaded with a strip of material, then operated by pushing first one section then the other into the base. The action is repeated with a 'walking' motion to produce a series of loops on the right side of the base material


LOCKER-NEEDLE HOOK

The locker-needle hook is relative newcomer to rag rug making, having come on to the scene in the 1921s. Similar to crochet hook at one end and large-eyed darning needle at the other, it makes a series of loops by pulling up fabric on the hook which are then 'locked' by pulling yarn through the loops with the needle., thus preventing the loops falling back through the base material. This method gives a more woven appearance than the traditional hooked rug. Locker-needle hooks come in two sizes, one for finer work and one for rug-making.


CARPET BINDING

Often used for finishing off the edges of rugs, carpet binding can be obtained commercially or made at home. The binding should blend in with the colours used in your rug. If you cannot obtain the colour you require, then you can always dye the binding. Always wash commercial binding, remembering to purchase more than you require to go around the edge of your rug as it shrinks by up to 7.5 cm (3in) per metre (yard) when washed.

If you want to make the binding yourself, use a strong material, always cut it on the bias and ensure that it is wide enough to allow for hemming on both sides and generous overlap.


DYES

You can dye or overdye any material if liked, either by using a proprietary household brand or a more expensive professional dye. Dyeing for rag rug making is generally not carried out as extensively in the UK as in North America. Some people use natural dyes but the process is time-consuming and not convenient for everyone.


LATEX/PVA GLUE

Latex can be used to seal the back of the rug. Polyvinyl acetate (PVA) woodworking glue, also known as white glue, can be used for the same purpose. One school of thought maintains that it is better not to used it because we do not know the long term effects it will have on rugs; the other says the latex holds the loops in well and gives a longer-wearing surface. Some of the makers of these projects have used latex; others have not.


ROTARY CUTTER AND MAT

Available from patchwork suppliers, a rotary cutter and mat are considerable help in cutting up material. Rotary cutters are made in two sizes and it is advisable to use the larger size for cutting any material thicker than cotton. The rotary mat is self-scaling and is a necessary adjunct to the cutter. Again the mat is produced in two sizes, with marked divisions to act as guidlines for cutting material straight. The larger size is more useful.


TRANSFER PENCILS

These resemble old-fashioned transfers and are used to draw a design on tracing paper which is then transferred to the base fabric by pressing the design transfer-side down with hot iron.


SCISSORS AND SHEARS

A sharp pair of scissors is essential for cutting out material and snipping off ends. Some shears can also act as scissors.


STAPLE GUN, STAPLES OR DRAWING PINS

Some people find a staple gun and staples very useful when fixing backing material to artist's stretchers, but others either do not want to go the expense or find they are a little hard to use. Drawing pins can be used instead. Make sure that you place the staples or pins very close to each other and pay particular attention to the corners.

If you had used staples, you will find a staple remover a great help; and old screwdriver is useful for removing drawing pins.


MISCELLANEOUS

For some projects a sewing machine is useful. An iron is used for pressing (for which you need a pressing cloth). Other necessary items of equipment are needles, including a large-eyed carpet needle; strong thread for sewing on bindings and hemming; string; a compass for drawing circles; wooden knitting needle; tape-measure; dressmaker's pins; sticky and cotton tape; drawing, graph and tracing papers; thimble; thin and medium card; waterproof felt-tip pens (for outlining the dimensions of your rug or wallhanging, drawing round templates, and touching up any faint lines when using a transfer pencil or making out centres). In one project white chalk is used for marking out a design.