Once you have decided on a colour scheme, plan how to distribute the colours. Use colours with caution, looking at how they react to each other. Your colour scheme may not only be dictated by your available materials, but also by where the rug will be placed. (If it is to be put in a much-used area, you may not want to use light-coloured materials). A good method of trying out colours is to spread small pieces of the material you are considering using on the floor of the room in which the rug will be placed. Arrange the colours in a way in which you th9ink they look best together, then stand back and consider the composition. You will easily see any colours that are either too bright or too dull. Add or subtract colours until you obtain a pleasing combination.
DYEING
The fun of using discarded clothing or off-cuts o material is experimenting with dyes. Here some pieces of bright orange material have been simmered in a proprietary brand of dye remover, and taken out of the pan at various intervals to produce a range of shades which all blend with each other.
A simple design can look just as impressive as a more complicated one. Obviously, when planning a rug or wallhanging, you have to bear in mind where you intend to place the finished article. Is the rug going to be seen from all angles or only from one position? Do you want it to be rectangular, oval, circular or another shape? (You will generally find that a square is not a pleasing shape for a rug). You should also decide whether, in the case of rugs, you want a border and if so, of what width. A border should not dominate the rest of the rug but equally it should not be so narrow that it looks lost.
PUTTING BASE MATERIAL ON A FRAME

It is essential to ensure the edges of the hessian/burlap are straight when placed on a frame, otherwise the base material will become distorted as you work.

To ensure a straight edge, ease a thread from one side of the hessian gently and put; it out. When you have pulled the thread out, you will see this leaves a line which can be used as an accurate cutting guide.
TRANSFERRING THE DESIGN
HOOKING TECHNIQUE
 Hold a strip of material in one hand loosely between your forefinger and thumb, under the hessian/burlap where your hook will enter. Holding the hook in the other hand as you would a pencil, and working from the front side, push the hook firmly through the hessian. Do not be too gentle: it is essential that you make a nice big hole. If you do not, the barb could catch on the threads when you pull the hook back up. Find the strip of the material with the hook and bring one end of the material about 2.5 cm (1 in) through the hole up to the front.
 Still holding the same strip of material loosely under the hessian, and working from right to left, leave two threads of the base mesh and then push your hook firmly into the hessian again. Catch the strip with the hook and pull it up tautly through the new hole to form a loop. Remove the hook from the loop. Repeat step 1 and 2.
 The reverse of the work shows how the hook completely catches the material to bring it up to the front. Don’t attempt to feed the material on to the hook; instead, allow the hook to find the strip of material. The reverse of your work should look like rows of running stitches. If you have any loops appearing on the reverse, this means you are not pulling your material up firmly enough to the front of the work. If you find you are pulling out your previous loops, this means you are holding the strip of material tightly instead of allowing it to run loosely between your thumb and forefinger.
 Continue working from right to left until you reach the end of the material strip. Bring the end o the material up to the front. To begin a new strip, push the hook into the same hole as the end of the previous strip and bring the new strip end up alongside it. Continue hooking as before. ‘In, scoop, loop’ will help you to remember the whole movement.
Cut any single ends that are showing so that they are level with the loops
 Leave about two threads between each row of hooking. If using wider strips of material, you should leave a few more threads between the loops and rows. Remember the loops must be close enough together so that you do not see the base material, but not so closely packed that they make the material ‘hump’.
Never be tempted to carry strips of material across the back of the base material from one point to another; You could push your hook into them and accidentally pull out a lot of loops.
PRODDING TECHNIQUE

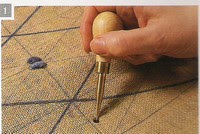
Working from the reverse side, and holding the prodder as you would a pen, push it firmly into the hessian/burlap, making a nice large hole.

Using the prodder, push one end of a cut strip of material firmly in to the hole you made, from the reverse to the front.

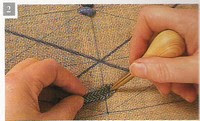
Using the fingers underneath the hessian, pull the strip halfway through – in other words to the right side of the work.

Leaving about two threads of the hessian mesh, and still working on the reverse of the work, push the prodder in again to make another large hole. Push the other end of the strip through to the right side and again pull it from underneath, so that it is level with the first end.

Push the prodder into the second hole with a new strip of material and repeat Step 2, 3 and 4. (Two strips will therefore come through each hole).

When repeated these steps make the shaggy pile which appears on the right side of the rug.
 How materials look when hooked
Around the outer edges of the photograph are the original materials and, adjacent to them, the same materials when hooked. It is always fascinating to see the effects achieved by hooking different materials. When in doubt about the suitability of any material, just work up a small piece to see the effect; keep these samples in a notebook for future reference.
